
You may have noticed a large section within the website form pricing where there are many additional charges and settings that can be set. This tutorial will walk you through each setting and show you where/how you can edit these and how they will work in conjunction with your website form.
An important aspect to note is that there are a few settings that when changed for a service type under one vehicle will change them for all of the vehicles. So if you go into a vehicle and set up those settings for “To Airport”, you just simultaneously set the same settings for all of your vehicles for “To Airport”. The great news about this is, you only have to set these settings up one time. The few settings that are service type wide will be noted as such below in the breakdown.
Okay, so to start, choose a service type listed under one of your vehicles. For the purpose of this tutorial, let’s choose Sedan: To Airport. Click the red edit wheel next to this service type to open up the pricing.
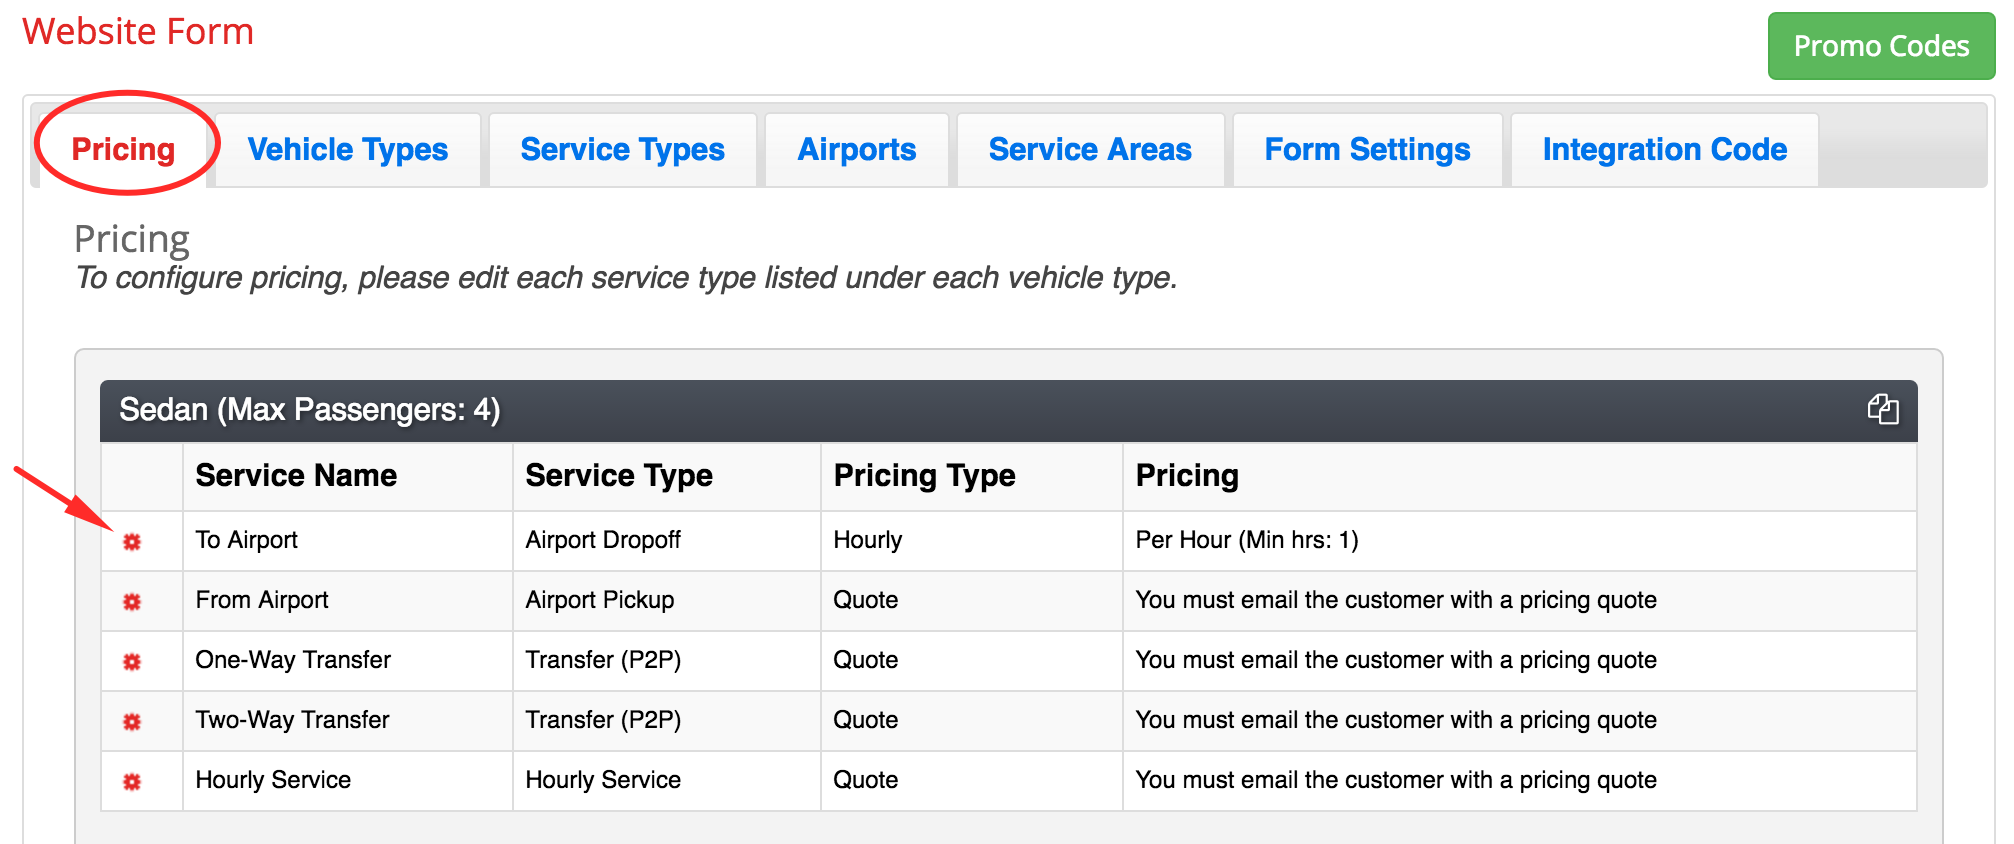
You’ll see along the left side a long section where you can edit all of the details pertaining to the service type of “To Airport”. To know more about general pricing, see Step 5: Pricing.
Here is a breakdown of each setting found in this section:
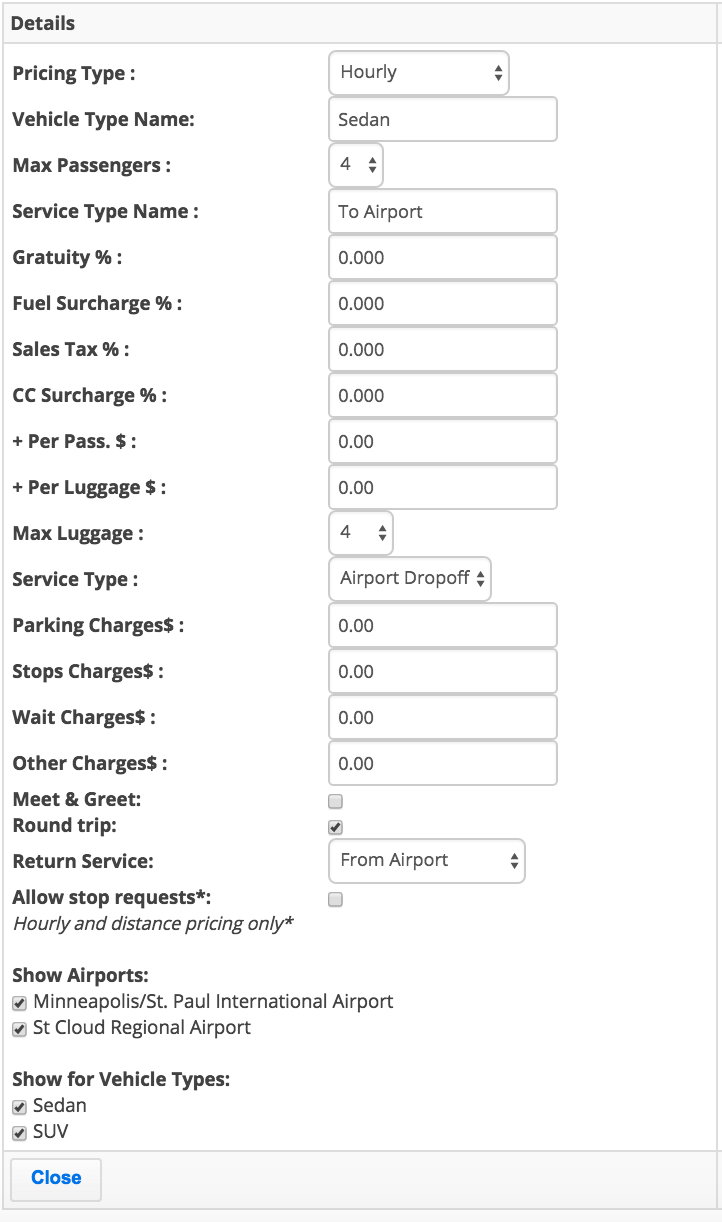
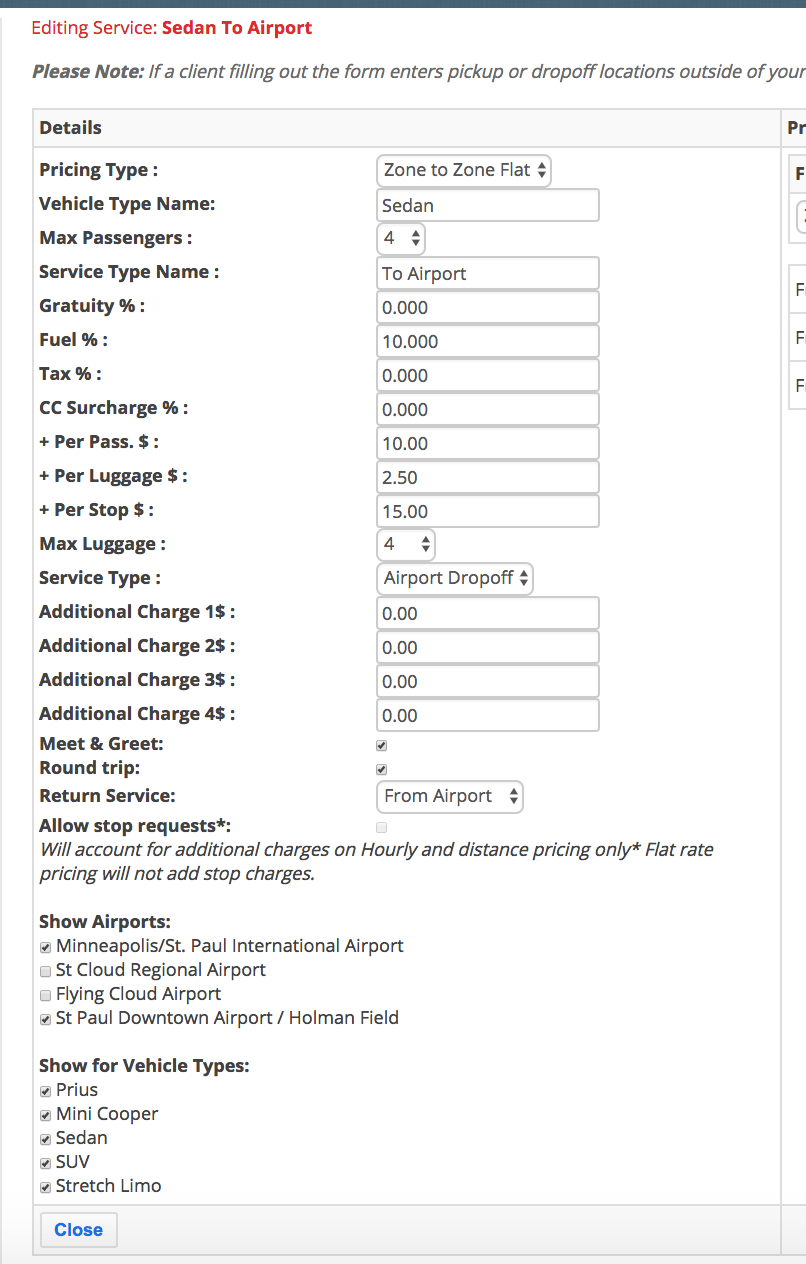
-Pricing Type: Choose the type of pricing you’d like to use for this vehicle/service combination
-Vehicle Type Name: This is the name of the vehicle you’re pricing. This is a setting that if you edit, will be changed everywhere else in the system.
-Max.passengers: This is the maximum amount of passengers that can be booked to ride in the vehicle. This is system wide, so if you change it here, it will change it everywhere for this vehicle.
-Service Type Name: This is the service type you’re pricing. If you edit it here, it will change within the entire system.
-Gratuity, fuel surcharge, sales tax and cc surcharge settings: You can input the percentage you want to be charged for each of these things.
-Per Passenger/Luggage Fees: For each passenger over 1, you can charge an additional fee. For luggage, you can charge a fee for each piece of luggage.
-Per Stop Fee: This fee will be applied to each stop that your client adds between their pick up and drop off addresses when booking ( eg. 3 stops would charge the fee 3 times).
-Max. Luggage and Service Type category were set up when you created your Service Type “To Airport”. For information on this, see Service Types. Editing these will change them system wide.
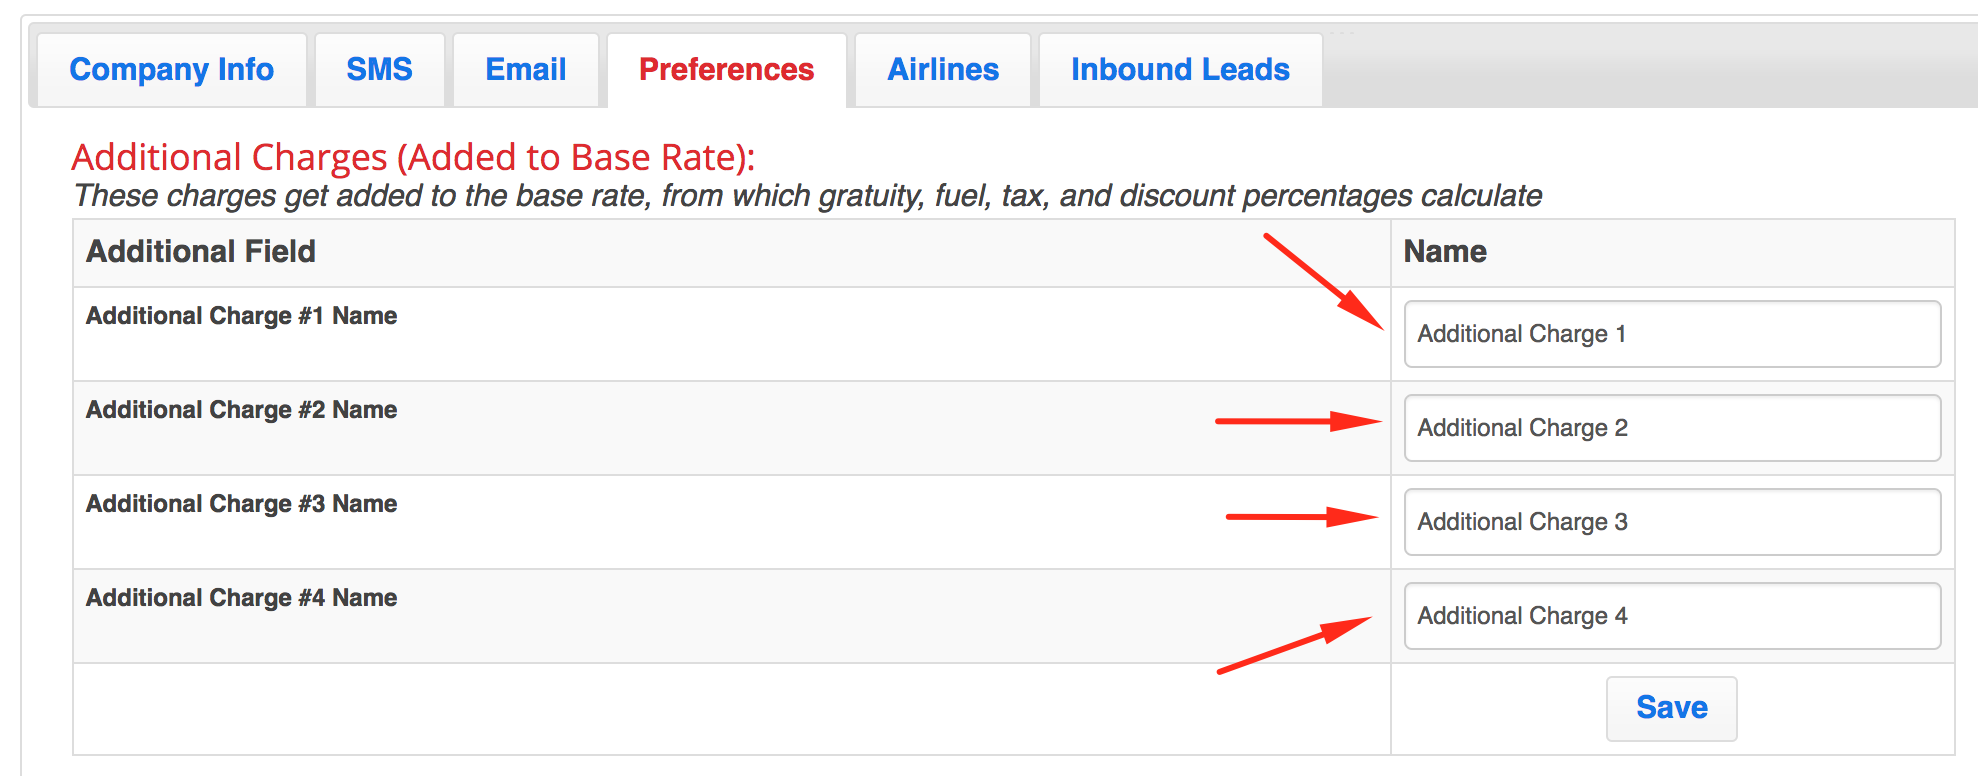
-Additional Charges 1-4: These charges are flat fees that will be applied anytime someone uses this service type (To Airport). You can edit the names of these charges by going to the “Company” page and choosing the “Preference” tab. They are at the top under the title “Additional Charges”.
One example of a good use for these kinds of fees would be a parking fee for airports. Remember this is for the “To Airport” service type. Many times you have to park in a special “limousine” lot and wait for your customer and you must pay for this, so you pass along a small extra fee to cover this. You can call this a “Parking Charge” and then input an amount. By doing this, every time a customer chooses “To Airport”, that fee will be attached.
Back to the pricing table, under these additional charges, you’ll see some settings for your service type:
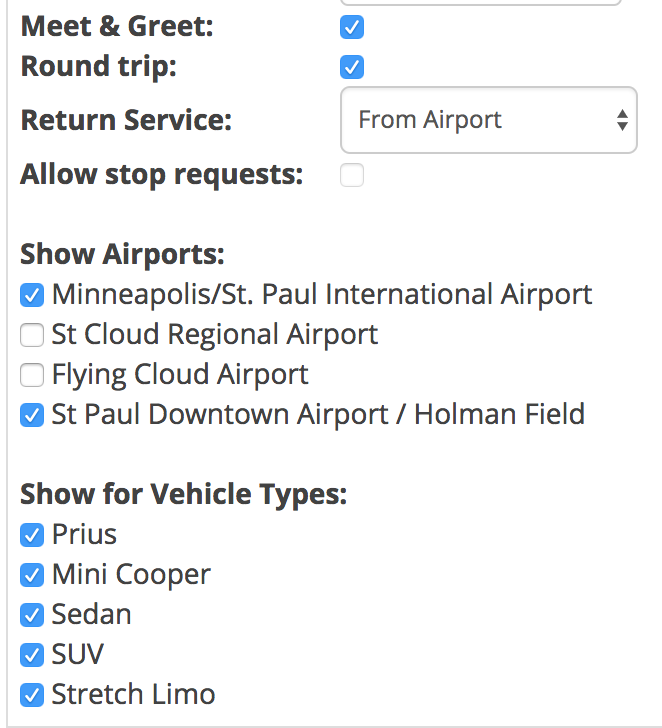
-Meet and Greet: Turn this feature on to give your customer the option to have meet and greet service. You can set the price for meet and greet by going to the “Company” page and choosing the “Preferences” tab. You’ll see a section for meet and greet and car seats right below the Additional Charges section.
-Round Trip: Turning this feature on will offer the customer the chance to book a return trip together with their initial trip. It does not force them to book a round trip if you have it turned on. It just allows them the option.
-Return Service: This only shows up for Airport Pickup/Dropoff service types. If you have the round trip option on, this allows you to choose which corresponding service type you want to be the return trip service type for the one you’re setting up. For instance, let’s say you decide to have a service type that is called “To MSP Airport” and one called “To STD Airport”. And you also input “From MSP” and “From STD”. If you are setting up “To MSP Airport”, you’d want to choose “From MSP” in your “return service” drop down menu so our website form knows which pricing table to look at for return trip prices.
For the most part, most of you will just be choosing “From Airport” or “To Airport”, whatever is opposite of the service type you’re working on.
-Allow Stop Requests: Check this box if you want to allow customers to add a stop/stops to their trip.
-Show Airports: Check the boxes of the airports you want to appear on your website form for this service type. Uncheck airports you do not want to show for this specific service type. Please note: This does not have to do with pricing, but is a service type setting. Unchecking an airport here will hide the airport for this service type, no matter the vehicle.
-Show Vehicles: This feature allows you to hide vehicles that do not offer this service type. Please note: This does not have to do with pricing, but is a service type setting. Unchecking a vehicle here will hide the vehicle for this service type. For instance, if you are working on “To Airport” and your stretch limousine and coach bus do not offer services to the airport, you can uncheck the boxes for those two vehicles and they will not be offered on the website form for the service of “To Airport”.
When you have finished updating all of your settings and pricing, be sure to press save before closing the window.