To add a new reservation from within the system, first go to the “Reservation” page. In the upper right corner, you’ll see a button that says “New Reservation”. Press this button to open up a new reservation window.
The first section of information to input is the information about the reservation and how it directly affects your company. You’ll see a place to input which DBA you’re using, an option to mark an inbound lead (don’t have any inbound leads yet? See our tutorial on Inbound Leads), time and date of the pickup, vehicle type and service type etc.
This section is pretty straight forward. You can also see what the current status of the reservation is and change it using the drop down menu in the upper right corner.
Next, you’ll be inputting client information, as well as the pick up and drop off addresses. If you’re creating a reservation for a client who is already in your system, their information will pop up as you type their name. If you’re creating a reservation for a client that’s new, the information that you input in their first reservation will save under a newly created profile for them.
Book Rides Online is integrated with Google Maps, so as you enter an address, address options will drop down. You must choose an address from the drop down options in order to use Google Maps. For both pickup and dropoff addresses you have the option to save the address as the client’s home address by checking the box with the house next to it, or save an address as a frequently used address for this client by checking the box with the save icon next to it. See the checkboxes circled above.
If you input an airport in either the pickup or dropoff address field, another section will drop down that allows you to input airline and flight information.
Next, you’ll be able to add any reservation notes either in general or for the driver.
Following this section you’ll have the option to dispatch the reservation to your driver via email or SMS.
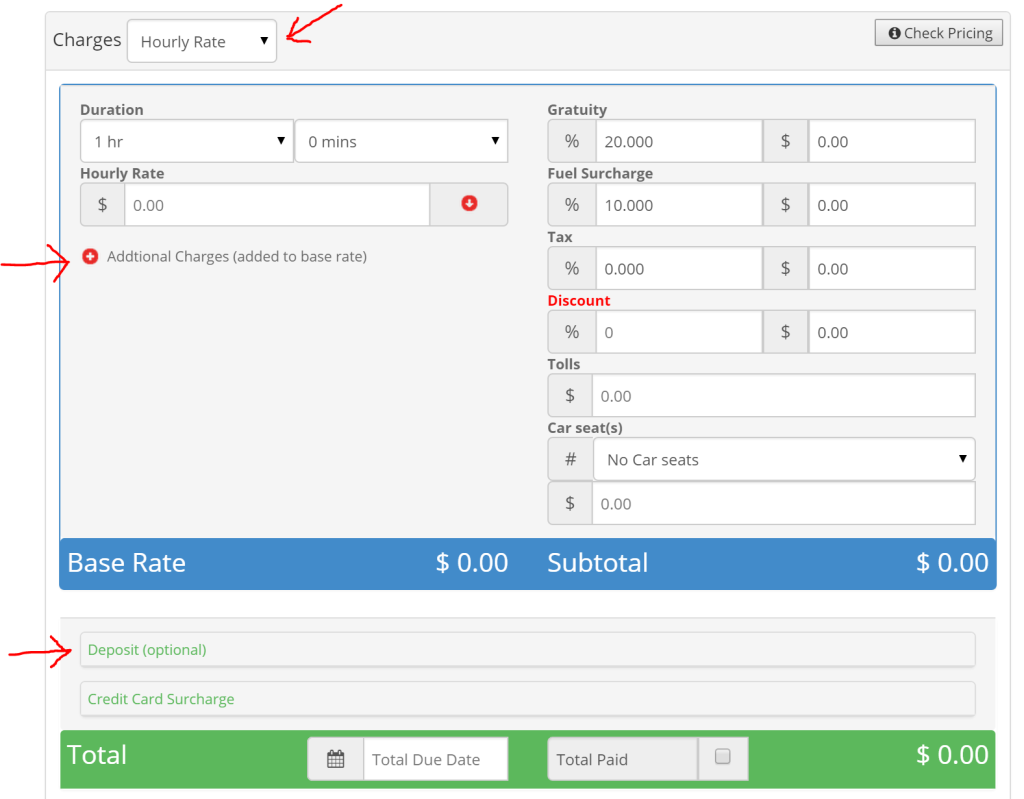
Next you’ll reach the charges section of the reservation. In the top left corner is a drop down that allows you to pick the kind of pricing that you need (hourly, flat, distance etc). Then you input the length of the reservation as well as the base rate. You can drop down the section for additional charges by pressing the red plus next to the words “Additional Charges”. To see how you can edit your additional charges, see our tutorial on Additional Charges.
After you finish inputting any gratuity, fuel surcharges, tax etc, the base rate and subtotal will appear in the blue row. (Want to set a default gratuity, tax and fuel surcharge? See our tutorial on Gratuity, Fuel and Tax). If your company requires clients to pay a deposit, click the green text that says “Deposit” as shown by the red arrow above. A drop down section will allow you input deposit details, amounts and due dates. You can also add credit card surcharges if you require this feature.
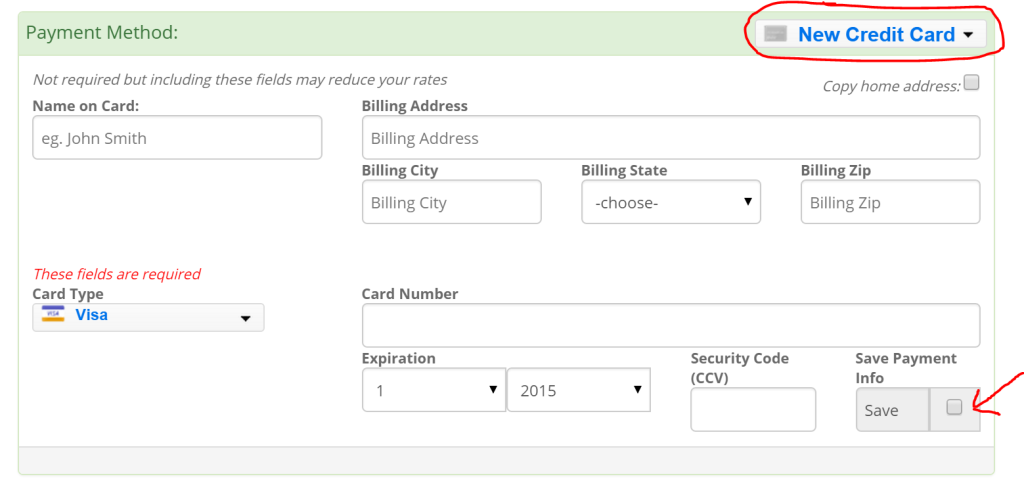
Finally you will need to input payment information. If this reservation is for a client who already exists in the system AND has a credit card saved in their profile, you can open the drop down menu in the top right corner of this section and the last four digits of their credit card will be listed as an option. Otherwise, you can choose a different payment method and input credit card information here.
If you’d like to save any payment information that you’ve entered to a client’s profile to use again for future reservations, check the check box in the bottom right corner marked “save”. Please note: You can only use credit card payments and save credit card information if you have set up your merchant account to work through our system already.
Once you’ve completed all of the sections of the reservation, you MUST press the save button located up in top right corner of the page. Once you’ve pressed save, you’ll be able to collect payments, dispatch reservations to drivers and send quote, confirmation and receipt emails to clients.
Reservations can be accessed and edited at any time. If you edit a reservation, be sure to press save again.


